Removing Plaster Wall without Removing Too Much Plaster Wall
When you’re taking down part of a plaster wall, that’s exactly what you want to take down—part of the wall. Not the whole thing. But plaster walls have the unfortunate characteristic of crumbling and crumbling, until nothing is left. You may have planned on taking down a 4 foot square section, but that section just keeps on expanding and expanding. Before you know it, you’ve taken down the whole frigging wall.
Limit the amount of plaster and lath that you remove with some of these techniques:
- Apply two layers of painter’s tape (i.e., expensive masking tape) in a perimeter around the area of plaster to be removed.
- Use a straight edge to score through that layers of painter’s tape, and down into the plaster itself. You don’t want to score all the way down to the lath (that’s pretty impossible anyway), but just about 1/8 inch down.
- Chop out the inner part of the square with a flat prybar. Go easy on it.
- When you get near about a 4-inch border near the outline, leave it be.
- Use the broad side of a piece of 2×4 as a buffer, and tap along those perimeter plaster areas with a hammer. This should help separate the plaster at the score lines. Do this until all the plaster within the masking tape square is gone.
- This may seem ass-backwards, but if you have any loose pieces of lath—nail them down.
- Cut out the lath with a reciprocating saw. The reason you nailed down loose lath is because the vibration from the saw can transmit to the lath…and knock out pieces of the “good” plaster outside of the masking tape square. You want to contain your operations to the center of the square.
- Pull out the remaining lath by hand, hammer, or with the pry bar.

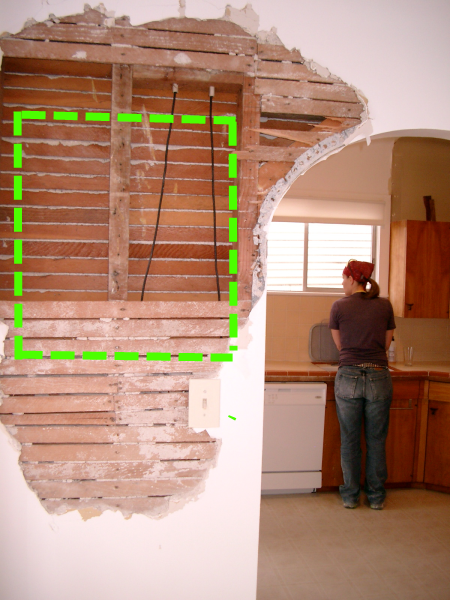
In the picture shown here, the technique is right for removing all of the plaster from the wall, but wrong for removing only a section of plaster. The green dotted line shows where the masking tape outline would go if you were just removing part of the plaster and lath.